Техническая документация по Dallmeier DF2000A_224eni
Operating instructions
Color Video Camera
DF 2000A
Please store these instructions for future use!
All rights reserved. This document may not be copied, photocopied,
reproduced, translated, transferred to an electronic medium or converted
to a machine-readable form either whole or in part without first receiving
written permission from Dallmeier electronic GmbH & Co.KG.
We reserve the right to make technical modifications.
The manufacturer accepts no liability for damage to property or pecuniary
damages arising due to minor defects of the product or documentation,
e.g. print or spelling errors, and for those not caused by intention or gross
negligence of the manufacturer.
Dallmeier electronic GmbH & Co.KG
Cranachweg 1
D 93051 Regensburg, Germany
www.dallmeier-electronic.com
info@dallmeier-electronic.com
1. About this document
Validity
This document is valid for the DF 2000A color camera. Firmware revision 1.2 - 3.0.15 / Version 1.1
Operating instructions
Connection assignment, lens mounting and configuration are described in these operating instructions.
Storing the documents
Store the operating instructions in an accessible location near the product and keep it in readable condition.
Signs and symbols used
! Attention!
Contains information on the prevention of damage and malfunctions.
Note
Contains information on limitations of properties or their characteristics.
TipT
Here you will find useful information on safe usage, background
information and recommendations.
References point (e.g. see Page ...) Reference point (e.g. see Page ...)Reference point (e.g. see Page ...)Reference point (e.g. see Page ...) Reference point (e.g. see Page ...)
References to pages, chapters or figures containing additional information are found here.
Words appearing in bold and cursive generally indicate menu commands.
Abbriviations in this document:
AC = Alternating Current
AGC = Automatic Gain Control
DC = Direct Current
DC-AI = Direct Current Auto Iris
ESD = Electrostatic Discharge
NTSC = National Television System Committee
PAL = Phase Alternation Line
PT = Pan Tilt
PTZ = Pan Tilt Zoom
UTC = Up-The-Cabel
WDR = Wide Dynamic Range
2. For your safty
Only use the camera if it is in proper technical working condition, for the intended purpose and while keeping safety and potential dangers in mind.
Observe the technical specifications and the corresponding instructions and/or documentation. Have malfunctions that could compromise safety
eliminated immediately! This applies especially for damage to the power supply.
- Use professionalsUse
Installation, mounting, connection, start-up and configuration of the DF 2000A may only be performed by trained and authorized professionals (installers).
As far as not expressly specified otherwise, this specification also applies for the maintenance, testing and repair of the camera.
- Read and understand instructions
Read the documentation for the camera carefully and completely before using the camera.
- Observe the rated voltage
The applied voltage must constantly match the rated voltage of the camera (see technical data).
- Protection against condensation Protection against condensation
Wait approx. 8 hours for the camera to reach room temperature before starting it up.
- Expansion components/peripheral devicesExpansion components/peripheral devices
Use only expansion components conforming with the technical specifications.
- Connection of the cameraConnection of the camera
Connection of the camera to a recording system or control panel may only occur while the camera is de-energized. Pull
the mains plug!
- Penetration of foreign bodies and liquidsPenetration of foreign bodies and liquids
The camera may not be subjected to moisture or rain. No objects or
liquids may penetrate into the camera.
- Note ambient conditions at mounting site
The camera was designed for indoor use. When used outdoors, the camera must be mounted in an appropriate weatherproof housing.
Do not install/operate the camera in places:
- with steam or oil vapors (e.g. kitchen)
- near sources of strong radiation, i.e. X-rays, radio transmitters or magnetic fields
- with corrosive surroundings (e.g. gases or salt water)
- with large scale dust and dirt.
- with an ambient temperature above 50 °C.
- Danger when opening camera
If it is necessary that the camera be opened, unplug the power plug before opening.
- ESD measures
Certain components of the camera may be damaged or destroyed by electrostatic discharge, even while disconnected from the power supply.
Carry out equipotential bonding. Carry out work only with the appropriate ESD protective measures in place.
- Do not make modifications
Dallmeier electronic GmbH & Co.KG accepts no liability for damage resulting from unauthorized or improper modifications to the camera.
- Mount the camera securely
The camera must be mounted securely to prevent injury to others (e.g. via falling camera) or damage to the camera.
- Observe regulations
Inform yourself on local regulations and requirements before using the camera. Also observe the local laws regarding data, working and environmental protection.
- Observe ratings
Ensure compliance with all technical ratings, operating conditions (Appendix) and requirements at the installation site.
- Disposal
Disconnect the camera from the power supply. Remove the power cable and all the expansion components / peripheral devices. Return
the camera to your respective sales partner.
3. General information
3.1 Delivery scope
Included in delivery scope:
1 x DF 2000A camera
1 x operating instructions
1 x hexagonal wrench 6 mm
3.2 Transportation and packaging
Store the original packaging for transportation at a later date. Dallmeier electronic is not responsible for damage resulting from unprofessional improper transportation.
Shipping should only occur in the original packaging.
If the original packaging is no longer available, ensure that the packaging used sufficiently protects the unit against damage, moisture, heat and cold.
3.3 Certificates
The following certifications were in effect for the DF 2000A camera at the time this document was produced: CE
3.4 Warranty
The warranty period is 36 months. The terms and conditions valid at the signing of the contract apply.
Notes on operating the camera
- The camera can be operated at 12 V DC or 24 V AC.
- The DF 2000A was designed for use with CS-mount lenses. An adapter
ring is required for use with C-mount lenses. Note the lens type before
using it. When using C-mount lenses without an adapter ring, the
camera could be damaged. This applies especially for the sensors.
- Lenses with DC control can be used for automatic iris control. Video
signal-controlled lenses are not supported.
- If the camera or the cable connected to the cable is located near
sources of strong radiation, the video picture may be distorted.
- The camera is equipped with automatic gain control (AGC). In low
light the picture may be altered (e.g. noise). This is not a camera
malfunction.
- The quality of the video picture depends on the lens used, the lighting
and the monitor used to display the video picture.
- Automatic white balance depends on the lighting used and can cause
color distortions in artificial light.
- Poor lighting can lead to faulty white balance.
5. Equipment and connections
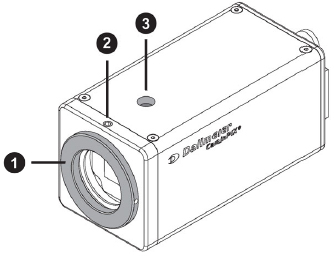
1. Lens mount and back focus adjustment
The lens mount (threaded ring) is suitable for holding CS lenses.
The threaded ring is also used to set the back focus (back focus
Chapter: Setting the back focus).
2. Setting screw
FSetting screw (2 mm Allen screw) for loosening/locking the threaded
ring when setting the back focus (back focus Section: Setting
the back focus).
3. 1/4" thread insert
A 1/4" thread insert is located above and below for mounting the
camera to a tripod, a wall mount etc.
!Only use screws with a max. length of 7 mm for mounting.
Longer screws could damage the amera.

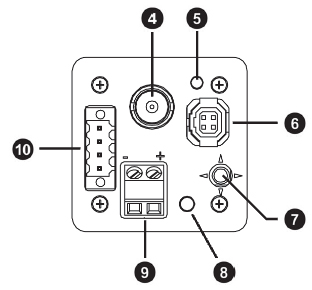
4. Video signal output (Video OUT)
A composite video signal (CVBS) is output at the BNC jack. The signal complies with either the PAL or the NTSC standard, depending on the signal system setting.
5. Operating voltage display
The LED illuminates when the camera is supplied with power.
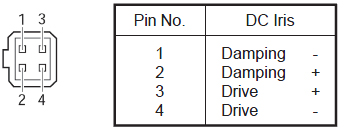
6. Connection for iris control
Control voltage for automatic iris control on lenses with DC control isnavailable at this connection.
!Check the plug for correct contact assignment (see table) before connecting the lens.
7. Selector
The selector is used for menu selection and to set the corresponding parameters.
8. Set button
Press the Set button in normal operation at least 2 seconds to display the camera menu.
Once the camera menu is displayed, a specific menu item or setting is activated when the Set button is pressed.
9. Power supply connection
The camera can be operated at 12 V DC or 24 V AC.
Connect the cable for power supply to the screw terminals 9 of the camera.
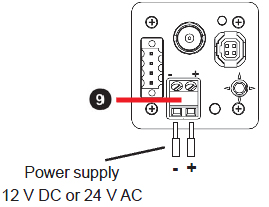
!You must ensure correct polarity of the cable when using 12 V DC. Use insulated cables. The cables for power supply may not contact the housing of the camera.
! If used in North America, note the following: You must use a UL-certified, limited-power Class 2 power supply unit (12 V DC / 0.42 A or 24 V AC / 0.20 A) for the camera power supply.
10. RS232c interface
A PT can be controlled via the RS232c (pin 1). The PT is controlled via the video cable by using UTC. For control via UTC, you require a recording system with the UTC function from the DMS/DLS product series.
Check for correct contact assignment.
PIN4 = RX input of camera
PIN3 = ground
PIN2 = ground
PIN1 = TX output of camera for PT
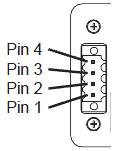
Customer-specific adaptation for control of the camera via the RS232c interface is available on request.
6. UTC Remote Box
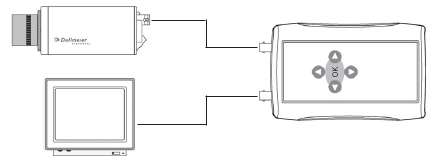
The UTC Remote Box (accessory) is a special on-site aid. If the camera is already installed, it can be configured via the UTC Remote Box. Direct access to the camera, e.g. on a mast, is not necessary. The buttons on the box correspond to the Selector and the Set button on the camera in all functions.
The UTC Remote Box is installed on the video cable between the camera and the monitor or between the camera and the recorder.
7. Connection and installation
7.1 Attaching the lens
!The length (a) of the lens thread (see following figure) plus any protruding parts may not exceed 5 mm, as otherwise the sensor could be damaged.
Check whether it is a CS-mount lens. If a C-mount lens is used, an appropriate adapter ring is to be used.
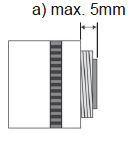
!The camera is pre-configured for use with DC-controlled lenses. For lenses with manual iris setting, the configuration (Section 8.1 ) is to be changed accordingly.
! Ensure that dirt does not end up on the sensor. Use only clean compressed air if cleaning is necessary. Under no circumstances may liquids or cotton wool be used for cleaning.
Remove the protective cap from the lens mount. Screw the lens onto the camera without using force.
7.2 Setting the back focus
The back focus is the distance between the lens support on the camera and the picture sensor. Optimum focus is only possible when the correct distance is set.
It may be necessary to set the back focus in inpidual cases due to production tolerances of the lens.
The iris of the lens must be open as wide as possible (smallest iris value) to set the back focus. For lenses with automatic iris control, you will require an ND filter (gray filter)
to prevent the iris from closing in bright light.
Setting for lenses with a fixed focal distance
If the focus cannot be set exactly by turning the focus ring (lens), proceed as follows:
1) Point the camera at an object with sufficient contrast. The distance to
the object should be greater than 1,000 x the focal distance.
2) Open the iris on the lens.
3) Set the distance at the lens to infinity (∞).
4) Loosen the setting screw 2 on the camera with the accompanying hexagonal wrench.
5) Rotate the lens ring 1 until the optimum focus is achieved.
6) Tighten the setting screw again.
Setting for lenses with a variable focal distance (zoom)
If the focus changes as the focal distance changes, proceed as follows:
1) Point the camera at an object with sufficient contrast at a distance of approx. 2 m.
2) Open the iris on the lens.
3) Set the maximum focal distance (Tele) at the lens.
4) Set the optimum focus with the focus ring.
5) Set the smallest focal distance (wide angle).
6) Loosen the setting screw 2 on the camera.
7) Rotate the lens ring 1 until the optimum focus is obtained.
You may need to repeat Steps 3, 4, 5 and 7 several times to obtain the best results.
8) Tighten the setting screw 2 again.
8. Konfiguration
Use the Set button 8 and the Selector 7 to call up the menus and to set certain camera properties.
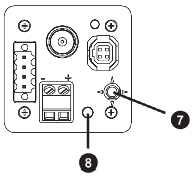
Displaying the menu
Switch the camera on. The operation indicator (LED) must illuminate.
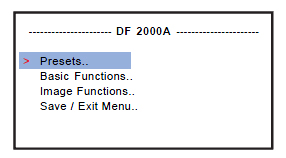
- Press and hold the Set button for 2 to 3 seconds.
The main menu is displayed on the monitor.
The cursor (>) is located on the first line at Presets.
Two dots after a menu item, e.g. Presets.., indicates that additional
configuration options are available in a submenu. One dot means that the
selected entry (command) is executed by pressing the Set button.
- Press the Selector up or down (
 ) to select a menu item from the list.
- Press the Set button to call up the selected submenu or to execute the command.
- Press the Selector to the right or left ( ) to change the respective setting value.
To return from a submenu to the higher-order menu, select Previous Page and press the Set button.
To make things easier, „-> Set button“ appears in the following whenever pressing of the Set button is required.
Saving settings
Select Save / Exit Menu ->Set button in the main menu.
Select Save Settings < Yes > ->Set button in the submenu.
The new settings are accepted. The camera switches to normal operation.
Cancelling configuration
Select Save / Exit Menu -> Set button in the main menu.
Select Save Settings < No > -> Set button in the submenu.
Configuration is cancelled. The camera switches to normal operation.
Changes made are not accepted.
8.1 Configuration for lenses with manual iris
If you use a lens with manual iris setting, the factory presets must be
changed before any further configuration occurs.
Select Basic Functions -> Set button in the main menu.
Choose Lens Select and move the selector to the left or right until the < Manual > entry next to Lens Select is displayed.
Select Previous Page -> Set button.
In the main menu you can now decide whether you would like to make additional settings or save your change and switch back to normal operation (see above).
8.2 Presets
The presets allow you to very easily adapt the camera configuration to the on-site conditions to achieve the best possible video picture. < Universal > is set as the preset at the factory.
Selecting a preset
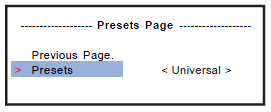
Select Presets -> Set button in the main menu.
Select the desired preset next to Presets with the Selector.
You can call up additional information or make additional settings for each preset by pressing the Set button.
Activating a preset
When you have decided on a preset, select Previous Page.
Select Save / Exit Menu -> Set button in the main menu.
Select Save Settings < Yes > -> Set button in the submenu.![]()
The following presets are available:

Universal
Used for scenes with very high contrast,
e.g. with backlighting from the sun or lights/lamps, with hard
shadows and heavy contrasts.
The maximum dynamic scope of the camera is used. Large
differences in brightness are adjusted.

Universal / Sh
Used for scenes with very high contrast.
The camera controller is geared toward shadowy areas.
Detail resolution in the shadowy area is optimized.
Bright areas of the picture are displayed brighter than normal.

Normal
Used for scenes with average contrast.
e.g. indirect lighting with weak shadowing and a normal amount
of contrast. The dynamic scope of the camera is limited, and
minimal differences in brightness are covered. Detail resolution
in brightly lit areas is optimized.

Fluoresc
Used indoors with artificial light.
e.g. when recording inside buildings with artificial lights and
weak contrast.
Detail playback in the bright area is optimized.
Typical flickering with neon lights is compensated.

Low Light
Used with minimal lighting.
With this preset the correct exposure is controlled via the
shutter.
If you select Low Light ->Set button, the Low Light submenu appears.
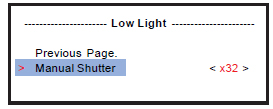
The shutter/exposure time can be set between x2 and x32 with Manual Shutter
8.3 Basic Functions
In the Basic Functions area you can make essential settings and
specifications for picture display. Select the entry ->Basic Functions Set button in the main menu
8.3.1 Camera ID
With Camera ID you can enter a unique name for the respective camera.
The maximum length of the ID is eight characters. Select Camera ID -> Set button.
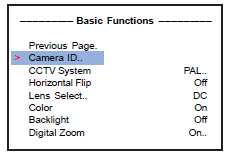
Entering characters Select Camera ID.
Select the appropriate character with the selector (right/left). The next position is activated each time the Set button is pressed, and you can enter the next character.
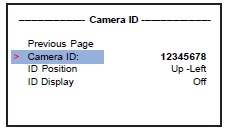
Position of the ID in the video picture Select ID Position. Select the desired position with the selector (right/left).
Showing/Hiding Select ID Display. Choose between On and Off with the selector (right/left).
If you select On, the entered camera ID is displayed at the selected position in the video picture (normal operation)
8.3.2 CCTV System
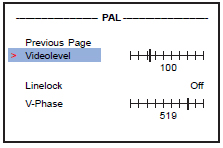
Setting the signal system Select CCTV System. Choose between PAL and NTSC with the selector (right/left). < PAL.. > is set as default.
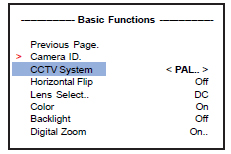
Setting the video level
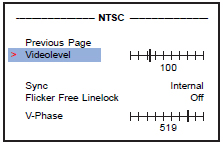
After selecting the signal system you can correct the video level in a submenu if necessary. For this purpose, press the Set button after setting the signal system.
The video level can be changed with the selector.
Setting the synchronization
With PAL choose between On and Off for Linelock. The VPhase can be adjusted if necessary.
With NTSC choose between Internal and Linelock for Sync. The V-Phase can be adjusted if necessary.
If you operate the camera with NTSC (60 Hz) with a 50 Hz mains frequency (e.g. in Japan), the flicker effect can be prevented with Flicker Free Linelock = On.
8.3.3 Horizontal Flip
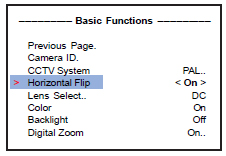
If picture recording occurs via a mirror, the picture must be flipped to obtain an accurate-to-side presentation. Select Horizontal Flip and pressthe selector to the right or left to switch between On and Off.
8.3.4 Lens Select
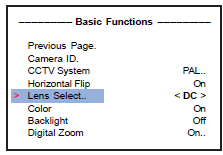
Choose Lens Select. Press the selector and choose
8.3.5 Color
In certain cases it may make sense to deactivate color playback. Select Color. You can switch between < B/W >, < B/W w/Burst > and < Color > with the selector. With < B/W w/Burst >, the video picture is black and white. The menus are displayed in color and can be read easier.
8.3.6 Backlight
When recording against backlighting, e.g. from windows, glass doors or other sources of light, the Backlight function prevents blanking of the object to a great degree. The camera analyzes the light conditions within the field of view and controls the lighting parametersaccordingly.
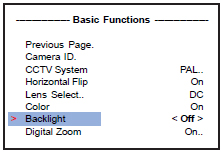
Predefined fields of view
Select Backlight.
Choose between < Up >, < Down > and < Center > with the selector. The designation describes the predefined position of the field of view in the video picture (in the example: Down).
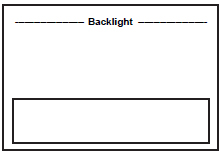
Freely-defined field of view
Select Backlight.
Select < Set.. > -> Set button with the selector.
The field of view is displayed in white.
With each additional press of the Set button, the color of the rectangle changes, and with it the possible shape of the modification when the selector is pressed.
White: The position of the field of view can be changed with the selector.
Green: The field of view can be enlarged with the selector.
Red: The field of view can be reduced with the selector.
Once you have set the size and position, press the Set button for approx.
2 seconds. You are back in the Basic Functions menu.
8.3.8 Digital Zoom
Select Digital Zoom. Choose the entry < On.. > -> Set button with the selector.
Set the zoom factor next to Zoom in the submenu.
!Digital pan and tilt is only possible if a zoom factor has already been set.
Select Pan to pan. Move the selector to the right or left. Select Tilt to tilt. Move the selector to the right or left.
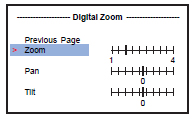
!The Backlight and Digital Zoom functions are mutually exclusive. If Backlight is activated, Digital Zoom is automatically deactivated, and vice versa.
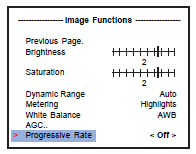
8.4 Image Functions
Select the entry Image Functions ->Set button in the main menu.
8.4.1 Brightness
You can set the brightness with the selector after selecting Brightness.
8.4.2 Saturation
You can set the color saturation with the selector after selecting Saturation.
8.4.3 Dynamic Range
Dynamic Range designates the scope of contrast between the brightest
and darkest points in the picture. With automatic Dynamic Range, the
distribution of brightness values is automatically adapted to the recording scenario.
The desired scope of contrast is set with the selector and encompasses
five levels, in addition to automatic adaptation (Auto), which you can choose with the selector.
8.4.4 Metering
With Metering you decide whether the balance point measurement is to
be based on bright points (< Highlights >) or dark points (< Shadows >) in the picture.
8.4.5 White Balance
With White Balance you can influence the white balance of the camera.
Choose the desired setting with the selector.
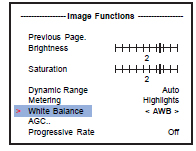
AWB
With < AWB > automatic white balance is carried out for the situation current at the time of measurement.
With light and therefore color temperature modifications, no new measurement for white balance is carried out.
ATW
With ATW (Auto Tracking White Balance) the white balance is continually recalculated.
The white balance is readjusted accordingly in different recording conditions.
Manual
With the setting < Manual.. > -> Set button, you can carry out the white balance manually as desired.
8.4.6 AGC
With AGC (Automatic Gain Control) the amplitude of the video signal is raised in poor light conditions. The point of use and maximum gain can be set in the submenu.
With the Offset slider you set the point of use when regulation is activated. With the Limit slider you set the maximum gain.
8.4.7 Progressive Rate
With Progressive Rate you can set whether and how often a picture is to be transferred unmodified.
Improved saturation and contrast can be achieved via multiple transmissions of inpidual pictures
8.5 Exit Menu
To exit the configuration and return to „normal mode“ you have two options.
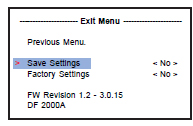
Save Settings
If you would like to save the changes made to the configuration, select the option < Yes > -> Set button next to Save Settings.
If you would like to keep the existing configuration, select the option < No > ->Set button next to Save Settings.
Factory Settings
To reset the configuration to the state of delivery, select < Yes > ->Set button next to Factory Settings.
!All changes made up to this point are lost with Factory Settings = Yes.
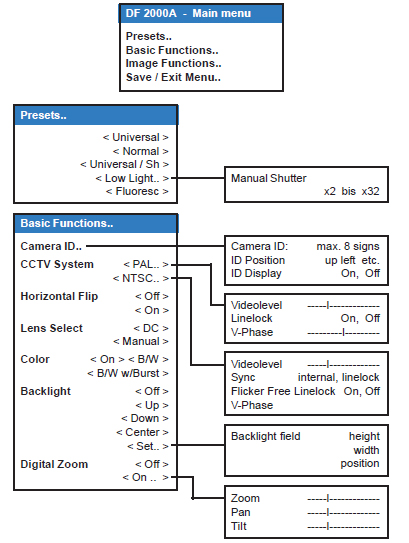
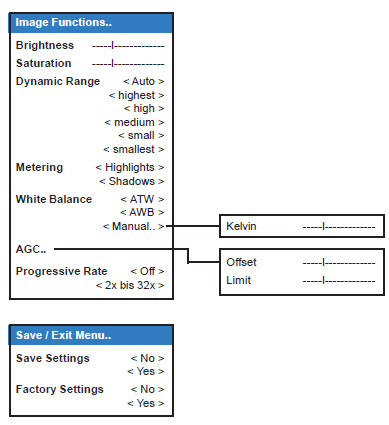
Menu structure
Technical Data
|
Image device |
1/3’’ sensor |
|
Pixel |
720 H x 540 V |
|
Video Norm |
NTSC / PAL selectable 525 lines / 60 Hz (NTSC) 625 lines / 50 Hz (PAL) |
|
Synchronization |
Internal or line lock AC (AC input required) |
|
Resolution |
480 TV lines (horizontal) 460 TV lines (vertikal) |
|
Dynamic range |
101 dB nominal 126 dB maximal |
|
Sensitivity |
< 0.8 Lux at f1.2, 50 IRE |
|
Signal-to-noise ratio |
> 50 dB (AGC off) |
|
Control |
Joystick / OSD and UTC / OSD |
|
White balance |
ATW, AWB, Manual (2,000 K to 11,000 K possible) |
|
Video output |
CVBS 1.0 Vpp at 75 Ohm |
|
Lens selection |
Manual lenses DC auto-iris lenses |
|
Lens mount |
CS mount C mount with 5 mm adapter |
|
Operating temperature |
-10° bis 50° C (14° to 122° F) 0° bis 35° C (32° to 95° F) recommended |
|
Power source |
12 V DC +/- 5% 24 V AC +/- 5% (50/60 Hz) |
|
Power consumption |
3.9 W (12 V DC) 4.3 W (24 V AC) |
|
Weight (without lens) |
approx. 270 g |
|
Dimensions (without lens) |
95 (L) x 45 (H) x 45 (W) cm |
|
Functions |
Backlight compensation AGC (Automatic Gain Control) Presets horizontale image flip Digital zoom |
